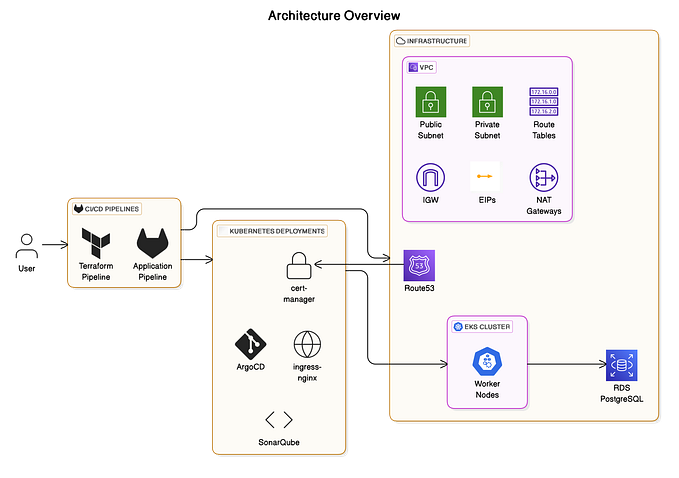
This guide will assist you in the creation of an Amazon VPC and outline some of the AWS security features. We will use AWS Cloud Formation to automate the deployment and provide a template for you to use in the future. We will be creating subnets in different availability zones (fault tolerance and high availability), application load balancers, shared services, and databases.
We will also make use of security groups (restrict network traffic), internet gateways, and NAT gateways to control traffic flows, Cloudformation as mentioned above, and use public and private subnets in AWS with route tables.
*you must have an AWS account and the recommendation is that you do not use your root account.
** At the end of the lab we will tear the infrastructure down to ensure our costs for provisioning such infrastructure will be at a minimum.
Creating a VPC stack
Step 1: Download a valid CloudFormation template.
Step 2: In AWS CloudFormation click create stack, then upload the valid YAML or JSON policy/parameter file of your choosing.
Then click next.
Step 3: Name the stack but make no changes to the options below, then click Next
Step 4: It is always best practice to add a tag and in this case, I used Owner (Key) and email address for that (value)
No advanced options or permissions will be used with this template so click Next.
Step 5: On the next screen you will have to acknowledge that you are using custom IAM role names. Please check the box and click next. Take note of the parameter section on this page where you can view the resources that will be created and CIDR ranges/assignments of the resources. In the next step, this stack will take time to provision since it is a decent amount :) of resources.
The creation of the CloudFormation stack is complete. As the resources are being provisioned through CloudFormation please check the VPC (you may see two one is the default, the other was created through this template from the YAML file I uploaded). The subnets, route tables, and NAT gateways are pretty lengthy and definitely worth a look at their associations. The estimated completion time for my stack was 8 minutes.
Teardown of this Lab is quite simple and a really big benefit to CloudFormation. On the below screen, click the button to the left of the stack you just created and make sure it is selected, then click delete at the top next to the search bar. Another screen will prompt you to delete the stack, please do so.
Tear down is complete!